Some simple PyCharm configuration tips & tricks

Way back when, in September 2020, I wrote a blog about how to configure PyCharm for use with ArcGIS Pro (and ArcMap); if you are interested in it then you can read it here. It is the main developer environment I use when I am writing my geoprocessing scripts using ArcPy because it has some great debugging functionality (unlike some applications….) and because it allows you to work with multiple Python environments.

Within the course people often ask a number of PyCharm related questions which usually begin with… “How do I do…?“. So in a bid to collate a few answers to these questions into an accessible location (and mostly to act as an aide for my sieve-like memory) I’ve written this small article which I hope you will find useful…..

I’m going to cover the following things:

  • Stop PyCharm from opening the previous project automatically on start-up.
  • Change the background colour in the script window.
  • Bulk comment and un-comment your code.
  • Indent and un-indent your code.
  • Obtain documentation for a function or a method.

I think that’s plenty to start with so let’s look at the first tip…

Stop PyCharm from opening the last project on start-up

If you have been working in PyCharm and you close the project down then, by default, the same project will open up automatically the next time you start PyCharm – you are not given the opportunity to choose a different project.

How annoying!

It’s quite simple to change this default behaviour in PyCharm.

All you have to do is:

  1. From the File menu > Settings.
  2. Under Appearance & Behaviour, click System Settings.
  3. In the Project group notice the Reopen projects on startup checkbox is ticked.
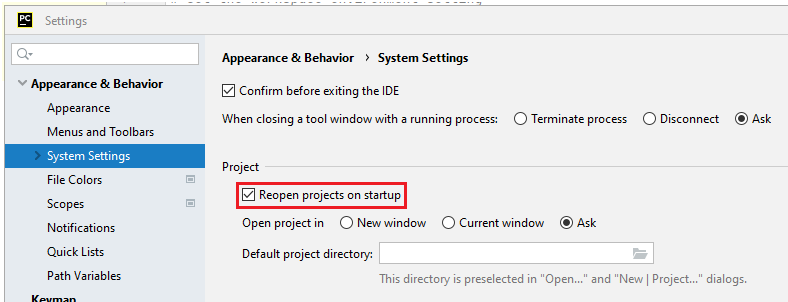
Untick the 'Reopen projects on startup' tick box
  1. Untick the checkbox!
  2. Press the OK button to commit the change you have made on the Settings dialog.

Hopefully the next time you open PyCharm you will then be given the choice as to which project you wish to open, as opposed to open the last project you worked on automatically.

Change the background in the script window

One of the things I always mention to course attendees is how to change the background display of the script window in PyCharm. Annoyingly the background is black which means you can’t see your mouse cursor very easily.

This is because PyCharm’s default colour scheme is called “Darcula”.

It is pretty easy to change, once you know how. Once again, the change can be made within the Appearance & Behavior tab of the Settings dialog box:

  1. From the File menu > Settings > Appearance & Behavior.
  2. Click the Appearance tab.

Notice that the Theme is set to Darcula.

  1. Click the drop down to choose a suitable theme.

You might want to have a look at the Windows 10 Light  or the IntelliJ Light themes.

If you would like a few more themes with the ability to have greater control over the colours within the application then you should look at the Color Scheme section of the Settings dialog; so:

  • File menu > Settings > Editor > Color Scheme > General

The Schemes area provides a number of additional colour schemes with greater control on the parts of the application to which the colour schemes can be applied.

Fill your boots.

Bulk comment and uncomment your code

Many developer environments provide you with the ability to select large swathes of code and through a button either comment or uncomment your code.

PyCharm is ever-so slightly different.

As you are probably aware PyCharm has a very “menu-driven” user interface. There are many menus (11 at the last count) and so finding the correct menu containing the correct item can be a little frustrating.

To comment your code, you can:

  1. Select the code you wish to comment.
  1. Press the <Ctrl> key and then the “/” key to comment your code.
  1. To uncomment your code you perform exactly the same operation.

The equivalent menu item to commentuncomment your code is found through the Code menu > Comment with Line Comment.

Indent and unindent your code

Every time you add error handling to a script, or you work with a compound statement of some description, then you will need to indent your code.

Indenting your code is pretty straight-forward. All you have to do is:

  1. Select your code.
  2. Press the <tab> key.

Your selected code is then indented by one tab width – you probably knew that anyway.

But unindenting your code is a little less obvious. To unindent your code you should carry out the following:

  1. Highlight your code.
  2. Press the <shift> and <tab> keys at the same time.

And your code is then unindented.

These indentation options are also available on the Edit menu.

Display a list of valid parameters for a function or a method

The final thing we will look at is to obtain some floating help for a function or a method.

To display the documentation you should:

  1. Place your mouse cursor between the brackets of the function / method.
  2. If the documentation does not immediately appear then give PyCharm a nudge by pressing <Ctrl> and P at the same time.

So there are my top 5 tips for working with PyCharm. If you have your own comments then please drop them into the comments section below so other people can enjoy your time saving techniques.

Configuring PyCharm for use with ArcGIS Pro (and ArcMap)

There are so many Integrated Development Environments (IDEs) that are available for writing your geoprocessing Python scripts. I think it is quite a personal choice – people who come on my training courses often ask if they can use a different IDE. If they are comfortable using it… then why not!?
Current flavours of the month are Jupyter Notebooks and PyCharm, but you just know that these will change as tastes change.

In this article we will have a look at how to configure PyCharm for writing geoprocessing scripts using the ArcPy site package supplied with ArcGIS Pro and ArcMap.

So why use PyCharm? I think there are a number of reasons:

1: It has good code completion and IntelliSense.

2: Its debugging capabilities are nice to work with.

3: It allows me to work with multiple Python environments, which is really handy for working with ArcGIS Pro.

So let’s set PyCharm up to perform some geoprocessing using ArcPy.

Step 1: Download and install PyCharm

The first thing you will need to do is download and install the ‘free’ Community edition of PyCharm. This can be found at the following location:

https://www.jetbrains.com/pycharm/download/#section=windows

Download the Community ‘free’ edition

Step 2: Understand ArcGIS Pro’s Conda environment

As part of ArcGIS Pro’s Python environment, the Conda Python package manager is supplied. This provides the ability to create and manage virtual Python environments for ArcGIS Pro. You need to understand where the default Python environment for ArcGIS Pro is located, as this is where all the packages and modules are located which you need to access in PyCharm.

The default Python environment can be found easily enough within ArcGIS Pro in the area known as the Backstage.

To get to this area:
1: Click the Project tab and once there click the Python tab on the left.

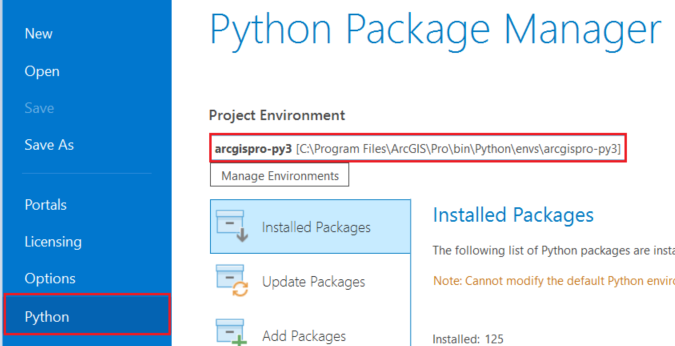
2: Locate the Project Environment section and notice that the default environment is called arcgispro-py3.

The default Python environment of ArcGIS Pro

You should make a note of this pathway as this ultimately points to the Python.exe file which you wish your PyCharm project to use. By default it will be:
C:\Program Files\ArcGIS\Pro\bin\Python\envs\arcgispro-py3

If multiple Python environments are available (as managed by the Python Package Manager within ArcGIS Pro) then they can be accessed within the PyCharm project to write your scripts.

Now you are ready to create a PyCharm project

Step 3: Create the PyCharm project

PyCharm is a project-based IDE. Pretty much everything you do in PyCharm is based on the concept of working with a project.

Let’s create a new project.

1: Start PyCharm.
When you start PyCharm you will be presented with the following dialog (or something similar to it).

2: Click the Create New Project button.

3: Choose the new location where the new project will be created and press Create.
It will take a few moments to create the new project. You can dismiss the “Tip of the Day”. In the diagram below a new project called ACME has been created in the C:\ACME directory.

If you look in the ACME folder in File Explorer you will see a sub-directory called venv and this represents the Project’s “virtual environment”. If you investigate this folder you will notice that it contains the “standard library” for Python but it does not contain any references to the ArcGIS Python libraries. You need to associate the ArcGIS Pro virtual Python environment to the Project’s virtual environment.

You will do this now.

Step 4: Associate ArcGIS Pro’s virtual Python environment to the Project

Setting up PyCharm with ArcGIS Pro’s 3.6 release of Python is a little fiddly. Hopefully these instructions will guide you through the process…

1: In PyCharm, from the File menu choose Settings.
This will display the Settings dialog box.

2: On the left hand side locate the Project: ACME tab. Remember that ACME is the name of the project.

3: Expand it and choose Project Interpreter.

This will display the default project Python interpreter. The current interpreter is using the 2.7 release of Python. This is because ArcMap is currently installed and comes with the 2.7 release of Python which the PyCharm project is using.

This needs to be changed to point to the default virtual Python environment that ArcGIS Pro is using.

4: Press the Wheel button highlighted…

….and choose Add.

5: In the Add Python Interpreter dialog box choose the System Interpreter tab on the left.
Notice that the project’s interpreter is pointing to the 2.7 release of Python.

6: Click on the breadcrumbs to the right of the Interpreter pathway box and browse to the following location:
C:\Program Files\ArcGIS\Pro\bin\Python\envs\arcgispro-py3

This is the default Python location for ArcGIS Pro.

Within this arcgispro-py3 folder you will see the Python.exe executable.

7: Click the exe file and press the OK button.

8: Press OK on the Add Python Interpreter dialog.
After a few moments, you will notice that the Project Interpreter updates to the Python 3.6 release which relates to the default Python environment for ArcGIS Pro. The packages installed with ArcGIS Pro are also added to the Project’s environment.

9: Press the OK on the Settings dialog box.
It will take a few minutes for the new packages to be registered with the project but you will soon be able to write your geoprocessing scripts!

After a few minutes you are now ready to create a new script and start to work with ArcPy.

Notice that once you have access to ArcGIS Pro’s default Python environment you can also import the arcgis site package. This means that you can also write scripts to administer and manipulate your ArcGIS portal! More about that some other time…

How do I configure PyCharm to work with the ArcMap flavour of ArcPy?

The process for setting up PyCharm to work with ArcMap’s version of ArcPy as exactly the same as if you were setting up PyCharm to work with ArcGIS Pro’s release of ArcPy.

The only difference is in choosing the location of the Python interpreter that is installed with ArcMap.

You should carry out points 1 to 5 in the above section (Step 4).

Once you get to point 6 you should:

  • Click on the breadcrumbs to the right of the Interpreter pathway box and browse to the following location:
    C:\Python27\ArcGIS10.x
  • …..and choose the Python.exe file.

  • Press the OK button, as you did previously, to associate the ArcMap Python interpreter to the PyCharm project.

How do I test which flavour of ArcPy I am working with?

You can identify which version of ArcPy you are using by writing the following simple 2 lines of code:

import sys
print(sys.executable)

When the above code is run it will display the following if using the ArcGIS Pro (3.6) default Python environment:
C:\Program Files\ArcGIS\Pro\bin\Python\envs\arcgis-py3\Python.exe

Or it will display the following if using the ArcMap (2.7) Python environment:
C:\Python27\ArcGIS10.x\Python.exe

And there you have it! It was a bit of a long, fiddly one but we got there in the end…

If you are going to use PyCharm then you might want to have a look at the following blog: “Some simple PyCharm configuration tips & tricks